Posts

Showing posts from February, 2012

Scratchie Holder Card Tutorial (Lottery Tickets with silver scratch panels)

Image
Edit:  I have seen a lot of searches visit this post searching for Embossing Foil.  In this post I use household alfoil but also have in my stash Embossing Foil which I purchased from Blue Edge Crafts.  You can find it here and here . Hi everyone, Here is my tutorial for the Scratchie Holder Card. I started with a piece of Stampin Up (SU) Not Quite Navy 210mm x 148mm and folded it in half for the base card.  Put this aside until later.   Next I cut a piece of A4 SU Riding Hood Red 297mm x 144mm. I then found the centre and embossed a fold line 5cm each side of the the centre of the card. To create the pockets I started with the left side of the red panel and measured 3cm down the side of the card.  Then cut from this mark to the fold at the top edge of the card. Repeated this on the right hand panel expect I cut from 6cm down the side of the panel to the fold line at the top of the card.  Don't throw away this offcut as this i...

Nephew's Scratchie Card

Image
Hi everyone, I seem to have lost time.....can't seem to find it anywhere. If you do find it please send it back home to me. :-) I have taken extra photos to go with this card, so that I can make up a tutorial but that will have to wait for another day.   I have since added some scratchies to this card and sent it off to my nephew for his birthday which was yesterday.  Oh and yes, Lynn, the scratchies are lottery tickets with the silver scratch part. I wanted to also share this card today as I had our latest challenge over at Unstampabelles in mind when making it.  The blue star is a bottle lid which I found on the street in Gordonvale outside of one of our many pubs (4 to be exact).  No I had just been to the Florist to have coffee.  The silver section of the card is alfoil.  I was inspired by our Guest Designer this month and also one of my tennis partners to use the foil in the embossing folder.  Comes out beautifully....this is four la...

Matchbox Swap at Craftmad

Image
Morning all, today I have a decorated matchbox to share with you.  This is our swap this month over at Craftmad for the Card Section.  We had to decorate an ordinary 'Redhead' matchbox or make our own and cram it full of crafting goodies to send off to our partner.  Check out all the swaps in the Craftmad album here. I rummaged through my scraps of paper and found the metallic silver paper and then a strip of the purple glitter paper .  The glittered green stem is also a strip from a piece of patterned paper.  The lovely flower I received in a swap from Craftmad a few years ago.  See everything does eventually find a home.  Not sure where the butterfly came from but I think she finishes the box off nicely. I filled the box with lots of tiny buttons, brads, and paper punched shapes. My arm is improving more each day and yesterday I went out and bought some Arnica Cream...thanks to Sharon's suggestion.  I think this is helping big ...

Happy Birthday Dad

Image
Morning everyone, today is my Dad's birthday.....  Here is the card I have created for him.  I had strict instructions that all he would like for his birthday was some Scratchies.  So that is where the idea of having pockets on the card to hold the scratchies came from.  I am so happy with how this came together and how quickly.  I started with Stampin Up (SU) Early Expresso for the base card.  Then I used a sheet of SU So Saffron for the pocket area on the card.  I will have to do a tutorial as I think I will be doing this card again.  Possibly next week for my nephew.  The papers I have used are from Blue Edge Craft from their Past Spodia range.  The bottom panel I ran through my Candy Stripe embossing folder.  Then added the lovely bronze skeleton leaf from Pizzazz Aplenty .  I then cut out the Deckled Edge Classic Oval with my Spellbinder using Linen Textured card and finishing with the gold sentiment sticker an...

Labelled my Copics

Image
Hey everyone, thanks to those who have been leaving such lovely comments.  My arm is getting better and I hope to do a little more computer time this week.  It's just the muscle in between my wrist and elbow that is strained. I have discovered that I am really right handed.  Every thing I want to do involves the used of my right hand and I am hopeless trying with my left. Thought I would share this little project that kept me busy.  Thanks to my wonderful friend Helen who shared this idea and also tracked down the CD rack for me.  An item that is dying out fast we have discovered.  Due to people buying their music online and possibly furniture already having built in CD racks. I really liked this idea of adding the Copic pen number to the ends of my pens to make them easier to find.   So I printed all the numbers on paper in Helvetica font size 7.  Then I used my hole punch to punch all the numbers out.  I did find that if I punche...

Happy Valentines

Image
Art by Melissa Hi everyone, HappyValentines day.  

No Cards

Image
Hi everyone, no card or creation from me today.  To busy food shopping ect. yesterday. Instead I thought I would share a photo of this tree in our yard.  All that cream/light green is actually new foliage not flowers.  It is just stunning and I have not seen it so full of new growth before.  I am not sure what type of tree it is but after image googling I think it belongs to the Brownea family.  It does get flower but mustn't be anything to wonderful as I can't remember what it is like.  If anyone is any the wiser or has a suggestion I would love to hear. After taking the other photo I had to go find my dog who went for a wander up the backyard.  Which where I spied the last of the Poinciana Tree.  We had one of these in our yard when I was growing up and it was such a fun tree to climb.  Normally they flower around Christmas time which is so apt with the colours.  Ours is always later, although it is a tall tree it is shad...

Birthday Birdhouses

Image
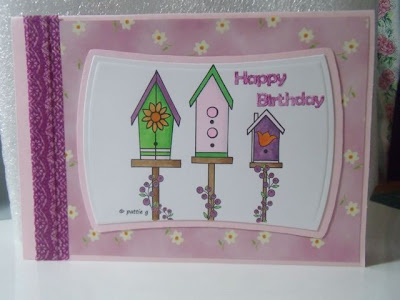
A fun little birthday card for a friends birthday this Saturday.   I started with Stampin Up Pink Pirouette, the pretty patterned paper is called 'Something Special'.  I finally used one of the Washi Tapes that I bought in Japan....the purple strip down the side.  Next I coloured this fun image ' Three Birdhouse' image from Pattie G .  Seems a long time ago since I have used my copic pens, so it was nice to sit and colour.  I cut around the image with my Spellbinder Reverse Wonky Rectangle die.   I had a lovely day yesterday catching up with friends and family I have not caught up with this year. This was through all types of method.  Firstly, email to New Zealand, phone call to Kewarra Beach, chat over feta and spinach quiche in Gordonvale, chat in bindery in Gordonvale, and lastly a cuppa tea with my SIL and their cute and chatty 2 year old son. Wishing you all a fun filled Thursday.

Happy Anniversary Mum and Dad

Image
Morning all, yes it is my parents 48th Wedding Anniversary today. How amazing is that. Here is the card I have made for them just this very minute.  I had thought that I would like to do something embossed and then thought of JennyH's cards which are always simply elegant.  This morning I visited Jenny's blog and saw a card she had just posted that I thought was really lovely so I have cased it.  You will find Jenny's card here. I started with some red Bazzill cardstock then a layer of this lovely Combo Paper from Blue Edge Crafts called ' Damask Designs '.  I added a strip of black.  I don't own any heart dies or punched so had to cut both of these free hand.  Embossed the red heart with my new Stampin Up Lattice embossing folder.  The white heart I cut out with my zig zig scissors.  Finished with silver sticker sentiment. Today, I am hoping to chat to a few people I haven't talked to this year. Have a good one everyone. ...

Get Well Flowers

Image
One of the ladies from the museum that I volunteer at had a nasty fall and broke her leg.  I have made her a get well card and thought some flowers would be nice.  So I made this pot of flowers.  The flowers actually pull up to reveal the greeting.  I used my Spellbinder Circle and Scalloped Edged Circles to create the flowers from Bazzill cardstock and paper.  I embossed the centre yellow circle with my Cuttlebug Swiss Dots embossing folder.  I cut the leaves freehand and embossed the centre for the vein.  The pot of the card I have covered with this lovely plaid adhesive paper from my DCWV pad.  Finished with a JustRite Get Well Stamp. I then made a stand for the back of the card so the flowers can be on display. Enjoy your Tuesday and thanks for all the the lovely comments about the magazine reed box.....I do hope that you get a chance to have a play.  It is fun and different.

Unstampabelles #8 - Recycle bonus technique Paper Bead

Image
Morning everyone, it's time for a new challenge over at Unstampabelles .  You know that wonderful blog that likes to see all forms of paper craft/art without the use of stamps. The month of January we had an Anything Goes challenge and saw so many talented crafters.....131 entries.  How terrific is that!! Unstampabelles Challenge #8 - Recycle, Frugal receive a bonus entry if you can include a paper bead. This is the wonderful prize on offer from Cardmaking Online . Here is my Design Team project.  I   started with a base box from a Christmas present - mobile phone.  I then made a lid out of card stock and adhered Magazine Reeds to the lid.   Tutorial here . Magazine Reeds are pages of a magazine rolled up.....bit like a large paper bead. The maroon flower is from a flower I have had in a vase for a couple of years and have pulled it apart.  The button is from my stash.  I should have taken a photo before I added...

Pinterest

Did you know that you can find if someone has pinned something from your blog on Pinterest? I didn't until this morning and I was over at Ricochet and Away .....fantastic (sewing) blog.  I just had to have a try and my search came up with four of my creations pinned on pinterest and whats more one of those....was then repinned three times.  So cool! So all you have to do is:  type this URL into your browser: pinterest.com/source/ YOUR BLOGS'S URL / Mine is: http://pinterest.com/source/merrymadecardscrafts.blogspot.com/ Note: that I have removed the .au as an error showed when that was included. Have fun.

Flashback Friday 20.0 ---- Time to Celebrate

Image
If you have just arrived from Sylvia's (GD Flashback Friday 18.0) you are in the right place.  If not and you would like to be part of this fun blog hop please visit Flashback Friday for more details. Yes, Amy is celebrating the fact that Flashback Friday has reached its 20th Challenge.  There are prizes on offer.  Amy is celebrating with a blog hop to past Guest Designer's blogs.  Yes, I was lucky to be Guest Designer for Challenge 18.0.   The theme for Flashback Friday 20.0 is the first Black and White card that you posted.  Here is mine: I didn't think I would be delving back so far.  This is one of my first ever posts and is the first card I entered into a challenge.  It is nice to go back in time...as I had forgotten about this card.  You can see the original post back on 28th November, 2008 To be eligible for the prize package, hoppers will need to leave comments on all the blog posts listed for the blog hop AND...

January and February Calendar pages

Image
Click on the image for a larger view Morning everyone, time to share my completed January Calendar page that I have been doing as part of the challenge over at ' The Kathryn Wheel ' blog. I have really enjoyed thinking about what I should try to draw each day.  Still no works of art.  I have learnt.....that I should not date the sqaures with my my black fine tip pen as it runs as soon as my aqua pen comes near it.  Also learnt that I enjoy my watercolour pencils more on the watercolour paper than my Aquamarkers.  I just have not got those Aquamarkers figured out....I have used them on the first row. Oh, one more thing I have learnt.....be sure to do each day as it is done or at the most leave it to three days because after that my brain really struggles as to what I have done. Here is my February page......I have really had fun digging through everything I own and finally getting to use some things that I have been waiting for that right moment for. ...

An Award from Kiddo

Image
The lovely Kiddo has passed this wonderful award on to me. Thanks so much Kiddo....please be sure to visit Kiddo's Blog as she does the most amazing quilling.