Wednesday, November 30, 2011

Thank you Butterflies


Told you I had been busy with these wonderful Chocolate Box cards (tutorial here)
This card is heading off to one of the Tuckshop ladies...we have three who help out regularly so there are more cards to come.  Just to say thanks for helping out the entire year and dealing with all those terrific teenagers.

This beautiful butterfly paper is from Hobby Fun.   That is the reverse side around the chocolates which may at first glance look like a cross stitch but are little butterflies all in a row.
The sticker sentiment is from the Sticker Store.
I have used my fun Spellbinder Crown Circle die to back the sentiment.

Rushing off again....things to see, places to go. :-)

Tuesday, November 29, 2011

Let it Snow


A card that I am having a love and not so love relationship with.

I started with a blank pink base card then layered up with black cardstock.  Then this lovely pink patterned paper I have had for a long time.  A layer of Stampin Up Rose Red to which I have added a rub on sentiment and a brushed silver heart brad.  Then I layered up this lovely digi image from Cardmadfairy called 'Christmas Carol'.  I coloured her with my copic pens then masked her and added blue chalk to the remainder of the topper.  I finished with some lovely silver snowflake stickers from The Sticker Store.

Thanks again for visiting......have a Terrific Tuesday.

Monday, November 28, 2011

Thank You Chocolate Card


Thanks to Kaye over at Craftmad and her wonderful tutorial I have been busy making Chocolate Box cards.  They have been so handy to say thanks to people and give them just a little something in appreciation.  So over the next few weeks you will see a couple more of these.

I have made this one for a special lady who has just finished up on the school P&C as her youngest child has now finished school.  So a little thanks for all the time and energy she has put into the school.
I started with black card stock.  Then Stampin Up Cherry Cobbler topped by this lovely paper from Kaisercraft....sorry don't know the name.  I have topped it with an old flower that I pulled to pieces and the Bugaboo image.  I coloured the image with my copic pens.  Added some flatback pearls from Pizzazz Aplenty and a sticker sentiment from Sticker Store.  The box I have edge with a lovely glitter border sticker from the Sticker Store also.  Also filled with yummy chocolates....one for you one for me. :-)

Guess what!!!!  I was the lucky winner of Flashback Friday 17.0 woohoo.....good ole random number chooser chose my number.  Now I get to Guest Design the next challenge. :-)

Take care and have a wonderful day.

Saturday, November 26, 2011

Another friend just joined Blogger

Hi, everyone, just letting you know there is another friend from Craftmad who has joined us in blogland.  Huggies Crafts....she is still in the learning stages but I am sure it won't take her long to get handle on everything.  Huggies Crafts has some lovely cards posted if you wanted a sticky beak.  http://huggiescrafts.blogspot.com/  If you want to follow her follower thingy is way down the bottom of the page.

Friday, November 25, 2011

Cardmadfairy Digi Days Challenge - Winter Wonderland


Hi everyone, time to share my last creation with you as part of the Design Team at Cardmadfairy Digi Days.  I must say I have really enjoyed my time with this lovely team.  Such a talented lot.  This however does not mean then end of my visits to each and everyone of their blogs. 
Also I know Jenni's (Cardmadfairy) images will continue to get a good work out.

This card is for the newest challenge #22 - Winter Wonderland.

I started the card with plain white base card...rounding two corners.
I then added a blue piece of the lovely new 'Textured Linen' card from Blue Edge Crafts
Next I added some of this lovely shimmery Allison Ellis Totally Christmas paper.
I coloured Cardmadfairy's  'Snowbaby and Pogo in a Pickle' image with my Copic Pens.  I used the blender pen to create the spots on snowbaby's outfit.  I finished the outfit with a little Kindly Glitz.
The sentiment is a rub-on.  Added silver holly like stickers down the right side.  The ribbon I gathered myself.  For some reason I have never thought to do that with my ribbons until I saw one on Ruth's card and asked where she got her lovely ribbon from.  Ruth then told me how she pulled the centre threads of her ribbon to create the gathered effect.  I so should have thought of this earlier. 
Finished the card with these lovely sparkly rhinestone crystal flower shapes.

Okay, now it is your turn to show off your Winter Wonderland creation.  
Remember you need to use a digi image to enter into the Cardmadfairy Digi Day Challenges.
Our wonderful sponsor this challenge is Meljens Designs.


Have a great weekend everyone.

Bookmark


Before I start I would like to first say 'Happy Birthday to Annmaree', have a great day.

I have been seeing these around in blogland a lot and the other day my friend Stacie posted one and I thought I just have to get to and make my own.  So off in search of a tutorial I went and discovered one to make this lovely monster....I knew I had just the paper for it.  Sorry, I can't remember where I found the tutorial but if it is yours please let me know as I would love to share the link.

So I fold pink cardstock as directed and then covered with this lovely bubbly metallic pink paper.  Punched out the circles for the eyes and then hand cut the razor sharp teeth.


Looks so great on a page doesn't it.....looks like it is ready to gobble up all the words.

Another week has come to and end.  However, I have one more post for you.  I will be back later today with a creation for the new Cardmadfairy Digi Days challenge.  Sadly, my last due to the busyness in my life these days.  See you soon. :-)

Ok, I am a little excited.  Jess from over at Jess' Craft let me know that I am the lucky winner of her blog candy.  Yay!!!  I now have $25.00 to spend on Stampin Up gear.
The hardest part will be narrowing my list down from the whole catalogue to a couple of items.
Thanks so much Jess. :-)


Thursday, November 24, 2011

Guess Whoooo......Thanks You


Time for a shaped card and owls are so much fun to create.
I started with an A4 piece of Kraft card which I folded in half and hand drew an owl shape.  Used my scissors to cut her out and then that shape as a template to cut out the owl from patterned paper - slightly smaller in size.  I attached this lovely patterned paper and then went around the edge adding dots of white gel pen.  I added some googlie eyes and fun eyebrows.  The beak is a little punched love heart which I coloured with my copic pen so that it was a closer match to the paper.  Then I printed off the the sentiment.

Hope you are all having a wonderful day and thanks so much for popping by and leaving a comment.
I really do appreciate each and everyone. :-)

Wednesday, November 23, 2011

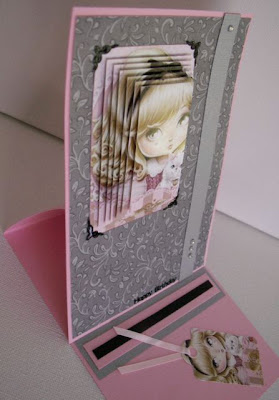
Easel Card


I really like easel cards....so effective but easy to create.  Now looking at this card in the photo I am thinking I need a little more of the cardfront....maybe some grey flowers or a flourish.  Will have to think about it.
The pink card stock is from Stampin Up.  The grey paper I have had for a while. I bought it to cover books a little while ago.  I have used a strip of mettalic silver card down the side.  Then added this terrific Pyramid topper called Helene Modern Miss.  She is so cute with her cat.  The little corner stickers and Happy Birthday sentiment are from 'The Sticker Store'.


Have a great day.

Tuesday, November 22, 2011

Stickers, Thinking of You


Hi!
I have had these lovely rose stickers from 'The Sticker Store' for a little while now.
Always admire them as I flip through my collection.  Finally had the chance to put them on a card. I really love the effect.  Started with a plain black card and then the layer of pink.  Added the three rose stickers and coloured just the base of the rose with my copic pens.  Added a touch of bling and a computer generated sentiment.

Another quick post.  I think for about three weeks you will find short quick posts from me.  Only because I will be busy with the kids in the first weeks of them being off school.  Spending time with them before they are too busy spending time with friends or working.

How exciting my entry into the Flashback Friday 17.0 challenge was featured. :-)
We had to share our first banner/pennant and mine had the little mouse juggling.

Monday, November 21, 2011

Sewing Swap - Owl


Hi everyone, another week closer to Christmas. :-0
Today I have a little felt owl that I have sewn for the October Sewing Swap over at Craftmad.
He was such fun to do....I do hope to create a few more or at least one for my daughter.
I have hand stitched the lot including adding the bias binding which was a little tough to sew through.

This month our swap is to sew a notebook cover for a small book.

Well short and sweet from me today.
Take care...thanks for visiting and I wish you all a wonderful week.

Sunday, November 20, 2011

Blog Candy at Cards Down Under


Morning everyone, I just wanted to share this candy with you.
A lovely Aussie lady is just starting back into the world of blogging after a year off sick.
Sandy has started a new blog and would like to catch up with everyone and have the chance to discover your blogs.  So Sandy, is offering a giveaway just to say Hi and that she has returned.

Sandy will be giving a way one pack of five Promarkers when she hits 25 followers.
Then six packs when she hits 50 followers.


Friday, November 18, 2011

Jack's Birthday


Morning all, somehow I missed yesterday it seemed to be a 12 hour day I am sure as there definitely was not enough time in it.  Well today is a big day all around.  It is our son's very last day of his school life. Soon it will be the start of a new adventure - job hunting etc.
Today, they are off to school to be presented to school for their final farewell then all on the bus to sunny Palm Cove to finish the day.  Here is a webcam I actually found....might sit here today and make sure our son doesn't get up to mischief. lol  http://www.cairnscam.info/
The kangaroo outfit the other day was a hit and his sister actually got outbid so didn't end up with her brother as slave for the day.  lol  Neither of the kids can tell me how much was raised but apparently they did well.

Now on to my card.  It is my youngest nephew's birthday today....he turns 'Two'.
Started with my blank white card and added these terrific boy papers which I have had a little while.  Tried to position the most appropriate words to be seen.  Added the three star brads down the side.  Used my Octagon spellbinders to cut out the image and the scalloped edged backer.  I coloured this fantastic 'The Paper Shelter' cowboy image which I was lucky enough to win.  I used my copic pens.
The number I cut with a die using my Cuttlebug.

I wish you all a funtastic weekend.  
Saturday night we are attending the Formal for our son.  I can't wait to see how beautiful all the girls look and how handsome all those boys scrub up.  Just after midnight on Saturday we put our son on a bus with some his mates and they head to Airlie Beach for schoolies.  Something we (hubby and I) would much rather he miss but our son has paid his own way.  There are organised activities down there but also a lot of happy and partying teenagers.  :-0
I think I have almost lost grip of those apron strings now.  :-)

I would like to enter into the following challenges.

My list :- Patterned Paper, Star Brads, Cowboy Image and Dies


Wednesday, November 16, 2011

Waterfall card and a Kangaroo


Something a little different today.  A waterfall card.  I haven't done one of these in ages and it took me a while to remember how to do add the tags so they flip correctly.   This lovely lady is from a printed sheet which has two sizes already to cut out.  The cutting is very easy as everything has a straight edge, so out comes the craft knife and metal ruler.  

To create the card I started with my blank white card and then a layer of pink followed by Stampin Up Blue Bayou which I have embossed with Christmas Vine.  Then it was a matter of assembling the waterfall card pieces.  Now this printed sheet does have instructions on it which if followed you will be able to assemble.  Sometimes I just read instructions and I think I know better. lol  So it take me twice as long.  Doing it my way and then how the instructions tell you.  I finished by attaching the waterfall piece with two little Stampin Up brads from the Subtles colour group and blue and pink thin satin ribbon.  Topped with a sticker sentiment.

Middle of the week......and our boy has three days left of school in his life.  Today is slave auction day at the school.  This is where the Year 12's are auctioned off to the highest bidder/s from the lower grades and they have them for most of the day to help them out with some of their classes.  They can't complete assignments or solve problems but they can handwrite information etc.
Our daughter and a couple of friends have pooled some money as she is determined to buy her brother. Loves the thought that he will never be able to do the same to her and also the thought that he will have to do her school work. :-)
What our daughter doesn't know is that our son has hired a kangaroo suit for the occasion.
She knows we have been keeping something from her and it has been so much fun listening to her guesses.  Can't wait to hear/see her reaction to this.  Especially since our son is normally pretty quiet and hides in the background.

Here he is in the Kangaroo costume...photos taken yesterday while daughter was out.


Tuesday, November 15, 2011

Christening Card for Ruby


Morning all, here is the other card I made for Ruby's Christening.  Isn't that such a pretty name. Anyways, this is the card that my friend chose to give to her granddaughter.  I must agree, I really like how this one turned out.  I started with a blank white card then a layer of pink vellum which has hearts drawn all over it and sadly the last little piece.  Next came layers of the new Textured Linen cardstock from Blue Edge Crafts in Pink and White.  I really like the feel of this card and a perfect thickness. I cut four slits into the white card front and threaded this white wire edge ribbon through to form a cross. I added the little charm just to make it that little more girly.  The sentiment is computer generated which I have raised up with 3D foam.

Have a terrific Tuesday everyone. :-)

I would like to share this with:


Supplies Used:

Monday, November 14, 2011

Christening Card and DT Call for Unstampabelles


My friend asked me for a card for her granddaughters recent Christening.  As per normal I have made up two cards so that she had an option.  This is the reject....although I love it. :-)

I started with the blank white card, a layer of Stampin Up Pretty in Pink then I added the topper which I have created with some pink bling.  The sentiment is computer generated.  Finished with three little pink flowers with bling for the centres.

I would like to enter this card into the following challenges:


*******************************************


Yes, we are in search of three new members for our Design Team to start January next year for a six month stint.

Sadly, we will be saying goodbye to Mandy, Kerry and Kaye at the end of our December challenge. They already know that 2012 is going to keep them plenty busy in real life but I am sure they will still find time to visit in the future.  We will miss their wonderful inspiration.

On a positive note though....this now gives you the chance to part of our fun and friendly team.
We will require a creation from you each month to showcase at the start of each challenge. 
If you have the time possibly a second card during the month to keep the inspiration flowing.

What to do to be considered:

Please just add a link to the InLinkz gadget at Unstampabelles of a project that you have posted (current or older) on your blog that will fit our challenge criteria.
Remember, all types of papercrafts and any technique....but NO STAMPS.

Our call will stay open until 12th December.

Have a great Monday.


Friday, November 11, 2011

Cardmadfairy Digi Days #20 - Texture


Wow, these weeks are flying by.  So great to see all the entries in our last challenge.  I really enjoy visiting these entries and being inspired.

You have until Friday, 25th November to get your entries in.  
Remember you can enter once and must use a DIGI stamp.  However,  if you enter with a Cardmadfairy image you can enter again.

Once again the winner of this challenge will receive their choice of Cardmadfairy digis and, as a bonus, anyone who enters using one of our own designs will be entered into a draw to win another 5!

Cardmadfairy Design Team Call.....just email Jenni with a link to your blog.
Sadly, I will be stepping down from this wonderful Design Team.  I have enjoyed every moment and it has been a pleasure to work with such lovely and talented people.
Work and teenagers seem to be taking up a lot of my time at the moment and I don't feel I am giving Jenni my full commitment.
So now you have a chance to join this terrific team. :-)

For my card I have used this cute 'Christmas Kitty' image from Cardmadfairy.
I coloured him with my Copic pens and added a touch of Kindy Glitz then cut out with my Spellbinders Labels die.  I have used a variety of embossing folders to create the textured white background.
Cuttlebugs - Swiss Dots and Candy Stripe and Stampin Up - Lattice.
I also embossed the red background card with Christmas Vine.
I cut the two green corners with a lovely Spellbinder die which I borrowed from my friend Helen....so have no idea of the name.  Finished with a little tag which I have stamped with a Christmas sentiment from Stampin Up borrowed from another friend Ruth.  Finished the tag with a little heart bling.

Now it is your turn...can't wait to see what you come up with.

Have a great weekend everyone.

I would like to enter this card into the following challenges:


Supplies Used:


Just Elfing Around (lots of garden photos)


Hi today I am using two of my newest discoveries.  The Just Elfing Around digi image from Cardmadfairy and these wonderful Christmas Brights Combo Papers from Blue Edge Crafts.
Yes, I have already made a card with these two items together except the papers had a white background.  It is here.

This time I started with a plain white card and then a layer of Stampin Up Melon Mambo and then layers of the stripes and baubles from the Christmas Brights Combo Papers.
I coloured the image with my Copic Pens and used a little Christmas sentiment stamp from a Stampin Up set courtesy of Ruth. :-)

I must also share with you that I so lucky to win a prize over at Michelle H's blog - I Luv Scrapping.  I left a comment but didn't realise I was taking part in a blog hop so I was very surprised and now excited. :-)  Thanks Michelle.

Also, the lovely Monica of Handmade Cards with Love has featured me this month on her blog.
I am very honoured, thanks Monica.  Please be sure to visit Monica and see all her wonderful creations.  Monica is a generous and kind lady.

I would like to share this card with the following challenge:


Supplies Used:


This is what I have been up to in the garden.

This is pile number one of bamboo ready for mulching.

Pile number two surrounding the tree that is now at ground level.

What is left of our bamboo plant. :-(
The above two piles mulched.

The mulch pile after four gardens being mulched.  Is it getting smaller???

Garden one mulched, weeded and trimmed Monday

Garden two mulched and weeded Tuesday (Thursday was spent raking all the bamboo trash up that has been on the grass since we started chopping)

Garden three mulched Sunday

Garden four the vegi garden mulched Saturday.  Marigolds in foreground planted to hopefully rid the soil of nematodes and watermelon, pineapple and parsley at the rear.

Hmmmmm.......no more tree.

Fingers crossed the yard will get a mow this weekend which will make things look so much tidier.  


Thursday, November 10, 2011

Flowers and Buttons


Morning all, I am sneaking in a post before I get sidetracked by my gardening. 
Only two gardens left to mulch now and the yard is starting to look half decent again.
I had another tree chopped down on Tuesday as it was under the service wire to the house and has always worried me.  Had talked to my hubby about it and thought he agreed with the plans.  When he got home he said 'I didn't think you were going to cut it that short'. lol Oops...it is ground level.  Oh well it won't have the worry of branches landing on the service wire in future.

My card today I started with my blank white card then a layer of Stampin Up Cameo Coral which I have pin pricked around the edge.  I then added the white die I cut with my Spellbinders Label 18.  Stamped some stems on to the die and then added these lovely Hydrangea Flowers from Pizzazz Aplenty and topped them with matching buttons.  Found these wonderful dragonfly shapes I had punched at some time.  They have a little glitter on them that doesn't show in the photo.  Finished the card with the raised sentiment created with two stamps from my Stampin Up collection.  Sorry being lazy and not walking to the cupboard to find out the name. :-)

I hope you all have wonderful days and achieve at least half of your list of things to do today.
I think we always put too much on that list.

Supplies Used:


Monday, November 7, 2011

Unstampabelles #5 - Trees

Morning everyone, a new week and a new challenge over at Unstampabelles.
Firstly, I just want to say thanks to everyone who entered.  We had 33 beautiful Autumn/Fall entries that did not use one stamp.  Such wonderful papercraft creations - cards, boxes, and decorations.

Now on to our new challenge - 
you will receive a bonus entry if you can add paper punches or dies to your paper creation.

Any form of paper creation will be accepted as long as NO STAMPS have been used.
So quilling, parchment, stickers, boxes, books, cards, scrap pages, etc
You can find our rules here for further information.


Our sponsor this week is CMD CARDS

Cherryn has a variety of beautiful paper punched shapes and other items available in her store.
This month CMD Cards are offering a $10.00 gift certificate to spend in their store.

Now a little about my card.  I started with my plain white card then a layer of Stampin Up Baja Breeze next this lovely patterned paper from a magazine giveaway.  The tree trunk I cut by hand and have used DCWV Textured paper same as the top half of the tree.  For top of the tree I cut to scalloped edged circles with my Spellbinders.  Then I used my little flower paper punch to punch out the flowers on the green cardstock.   Then I layered the green over the rust coloured circle.  I added a little white (leftover) sticker to the centre of each flower.  I have added these lovely punched butterflies from CMD Cards. For the sentiment I have used two Stampin Up punches and then added the lovely white sticker sentiment.

Wishing you all a terrific Monday.  More gardening for me planned.  I managed to plant marigolds in my vegi garden on the weekend in hope to rid the soil of nematodes which destroy my tomatoes each year.  I saw a gardening show where this guy just mass planted marigolds in the off season and then dug them into the ground when he was due to plant his tomatoes.  Up the other end of the garden I have a couple of watermelon plants growing.  I added mulch and gave them all a good drink of seaweed liquid.  Will try to share some photos soon.

I would like to enter my card into the following challenges:

Saturday, November 5, 2011

Flashback Friday 17.0


Hi everyone, it's time for a new challenge at Flashback Friday 17.0.  This month they are asking you to share your first ever pennant/banner you posted about.  Remember you can't link your original post.
Well I did not have far to travel back in time for this one.  I had been seeing pennants around everywhere but never took the time to use one on my cards until April 2011.  Yes, only a couple of months ago.  My original post is here.

I really enjoyed creating this card and must get to and do another pennant soon.
I had to share this card with you quickly as Amy who runs Flashback Friday is celebrating 4 years of blogging.  Congrats to Amy and so glad she came up with this challenge concept.
Yes, there is a prize involved.  You will have to visit to find out the details.

Well have a lovely weekend everyone.  I have a bit of gardening planned to used up our bamboo mulch.  Will share photos soon of where we are up to with the bamboo plant.  

Thursday, November 3, 2011

Three Christmas Trees


Morning everyone,  what a lovely fine day it is here.....the birds are a chirping and the sun is a shining.

Today my card came about from the Daily Pink Challenge.....which was to use ribbon.
I made this card on our girls weekend away and was lucky enough to be able to use Ruth's Stampin Up stamp set and matching punch. Sorry I do not know the names of either.  I have also used the Stampin Up Subtles range for the cardstock and inkspots.

So I stamped up the cute little christmas trees and punched them out.  Added a cute little bow to each of them.  The centre tree I have raised on 3D Foam so it would sit neatly with the wonderful bling frame.
I attached this lovely silver tinsel ribbon along the bottom of the card. 
Pin pricked all the around the edge of the card and finished with this cute little 'merry' sticker.
I have so been wanting to do that for a long time on a Christmas card...just add my nickname.

Have a great day everyone.


Wednesday, November 2, 2011

Using a sentiment as the focal point.


Hi everyone, I have two simple cards to share with you today.  Now this card came about because of the Daily Pink Challenge.  The challenge was to make the sentiment the focal point of the card.  I was really happy with the end result of this card.  Then remembered the main part of the daily PINK challenge was to incoporate pink. Doh! I used red. lol


So now I have two christmas cards ready to go. lol Here is my pink version of the card.
The sentiment is from a Stampin Up set and I did faux stitching around the edge.
The little Christmas tree is from CMD Cards.

Supplies Used:

Tuesday, November 1, 2011

Christmas Bauble


Hi everyone.  Well it is Melbourne Cup day today here in Australia.  Yes, the race that stops a nation.  I have no idea what horses are racing but a couple friends and I will be catching up to play ladies at lunchtime.  So good luck everyone and enjoy your day.

Today the card I have to share with you was inspired by Cathy with her latest card she made for the Unstampabelles challenge.  You can see it here.

I started with a shaped card...it has a circle cut out of the front edge of the card.  I added the square of acetate behind this shape.  Then added the white piece of card with I have stamped with Merry Christmas and edged it with a gold sticker border.  I added the maroon ribbon to make the circle look like a bauble. Found this lovely patterned paper which I have cut one piece of the border out to run down the edge of the card.  Then added holly stickers to each acetate corner.

I would like to enter this into the following challenges:


Supplies Used:

LinkWithin

Related Posts with Thumbnails